首先要下載 VirtualBox 跟 Android 4.0 X86 ISO,記住要下載的是 android-x86-4.0-eeepc-20111209.iso這個版本,其他的版本可能會無法安裝在 VirtualBox 上。
電腦一台,作業系統 Windows XP, Windows 7, Linux, MacOS 都可以
Oracle VirtualBox
Android 4.0 x86 ISO
目前 Android-x86 4.0 iso 已經推出新版本(20120101),不過新版本有一些小問題,會無法進入系統。
舊版本(20111209)可以在這裡下載。
(U)EFI is the next generation of BIOS. When you install ESXi 5.0 on VMware Workstation 8, it just uses a regular BIOS.
It is however possible to use EFI instead of BIOS.
The vSphere Installation and Setup guide states that you shouldn’t change the boot type from BIOS to EFI on an already installed ESXi host. It does work however in VMware Workstation. But for production systems, just stick to the guide and reinstall the host using EFI instead of BIOS on your hardware server.
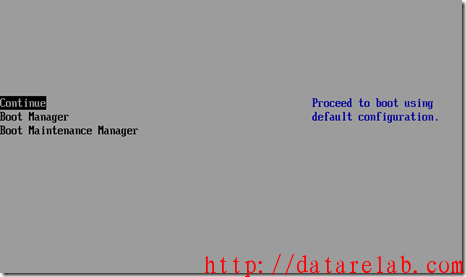
Now, your normal Virtualized vSphere host in VMware Workstation uses a BIOS. Notice this in the startup screen when you boot the VM:
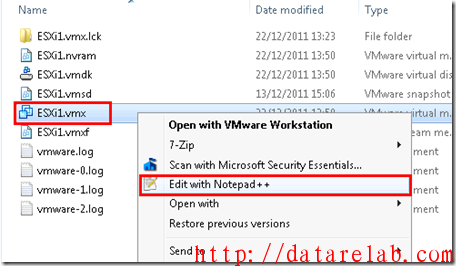
Power down your Virtual ESXi host. Go to the location where the vmx file is stored and edit it with your favorite editor.
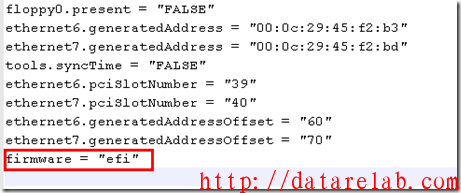
Add the line firmware = “efi” somewhere in the vmx file.
Close and save the vmx file. Power On the ESXi host. You’ll notice the progress bar at the bottom during the boot is gone:
If you look into the vmware.log you can also see some references that he’s using EFI now:
Et voila, your ESXi hosts are now booting from EFI instead of BIOS!
Tip: if you press ESC during the boot, you can configure some EFI parameters. Play with it and learn to know if since EFI will replace BIOS gradually!
This boot partition is used by Mac OS X when the file system on the main partition is not an Open Firmware conforming HFS partition, such as in a software RAID configuration or when using a HFS+ case-sensitive or a UFS file system.
Apple_Bootstrap
NewWorld bootblock
Although it is a general Open Firmware (New World) boot partition, it is specifically used by yaboot. It must be HFS formatted, so that it can be accessed by Open Firmware.
Apple_Driver
device driver
Mac OS classic drivers partition
Apple_Driver43
SCSI Manager 4.3 device driver
Mac OS classic drivers partition
Apple_Driver43_CD
SCSI CD-ROM device driver
Mac OS classic drivers partition
Apple_Driver_ATA
ATA device driver
Mac OS classic drivers partition
Apple_Driver_ATAPI
ATAPI device driver
Mac OS classic drivers partition
Apple_Driver_IOKit
IOKit driver
Mac OS classic drivers partition
Apple_Extra
unused
This identifier masks an unused partition map entry.
Apple_Free
free space
This identifier masks free space as a partition map entry.
Apple_FWDriver
FireWire device driver
Mac OS classic drivers partition
Apple_HFS
Hierarchical File System
While normally a HFS or HFS+ volume for Mac OS and Mac OS X, it can also contain an MS-DOS formatted file system (File Allocation Table, which can be accessed by Mac OS and Mac OS X).
Apple_HFSX
HFS Plus
This partition contains a HFS+ volume without a HFS wrapper. HFSX was introduced with Mac OS X 10.3 and is only used in special cases, like case sensitive HFS+. HFSX is the standard partition type on Intel-based Macs (which use GUID instead of APM).
Apple_MFS
Macintosh File System
This partition is used by Mac OS for the Macintosh File System (MFS), which was introduced with the Macintosh 128K in 1984.
Apple_Partition_Map
partition map
The partition map is also a partition of its own. It can vary in size depending on how many partitions it may contain.
Apple_Patches
patches
Mac OS classic patch partition
Apple_PRODOS
ProDOS
ProDOS file system
Apple_Scratch
empty
This identifier marks an empty partition.
Apple_Second
Second stage bootloader
Apple_UFS
Unix File System
This partition contains a Unix File System (UFS) and is used by Mac OS X and various Unix-like operating systems.
Apple_UNIX_SVR2
A/UX
Originally introduced for A/UX (Apple Unix operating system based on System V Release 2, hence SVR2) on the 68k, it was later reused for MkLinux which used the Extended file system. It is the standard partition identifier for many Unix-like operating systems, including Linux and NetBSD. It may contain any file system suitable for the installed operating system. If bootable, a file system that can be read by the Open Firmware bootloader from Apple_Bootstrap (e.g. yaboot) must be used.
Apple_Void
ISO9660 padding
A dummy partition map entry to ensure correct partition alignment on bootable media.
Be_BFS
Be File System
This partition contains a Be File System (BFS) and is normally used by BeOS.